Vous êtes déjà retrouvé dans une situation où vous aviez désespérément besoin d’un mot de passe Wi-Fi que vous aviez utilisé auparavant sur votre Mac, mais vous ne parvenez pas à vous en souvenir ? Ne vous inquiétez plus ! Dans cet article de blog, nous vous montrerons une astuce simple pour récupérer n’importe quel mot de passe Wi-Fi stocké sur votre Mac en utilisant le Terminal.
Votre Mac conserve discrètement tous les mots de passe Wi-Fi que vous avez déjà utilisés, et avec une simple commande dans le Terminal, vous pouvez accéder à ces mots de passe en quelques secondes. Voici comment faire :
Ouvrez le Terminal sur votre Mac (vous pouvez le trouver dans le dossier Utilitaires ou en utilisant la recherche Spotlight).
Remplacez « nom-du-réseau-entre-guillemets » par le nom du réseau Wi-Fi dont vous souhaitez récupérer le mot de passe, entre guillemets. Par exemple :
security find-generic-password -wa "Wi-Fi de la maison"
Appuyez sur Entrée et, si nécessaire, entrez le mot de passe administrateur de votre Mac.
Le Terminal affichera alors le mot de passe Wi-Fi recherché.
Gardez à l’esprit que cette astuce fonctionne uniquement pour les réseaux auxquels vous vous êtes déjà connecté avec votre Mac. Elle ne vous aidera pas à craquer les mots de passe des réseaux inconnus.
Conclusion :
Cette astuce simple du Terminal est une véritable bouée de sauvetage pour les moments où vous avez besoin de récupérer un mot de passe Wi-Fi utilisé précédemment. Vous pouvez désormais accéder facilement à vos mots de passe stockés et rester connecté sans problème. N’oubliez pas de consulter notre blog pour découvrir d’autres conseils et astuces pour Mac, ainsi que des informations sur le travail multiplateforme entre les produits Apple, Microsoft et Google.
CodeIgniter Wizard is a relational database-driven PHP code generator and a Rapid Application Development (RAD) tool for the Mac which reads your MySQL database tables and columns, presents you with some options to determine which ones to include, how to interpret them, and then quickly creates a working web application with full CRUD functionality based on version 4.x of the CodeIgniter framework complete with entity models, views and controllers (even entities) and a Bootstrap 4-based CSS layout. The generated code is secure, clean, highly re-usable, and portable.
It is a desktop application with an intuitive GUI which runs on computers with macOS High Sierra or later installed.
It’s functionality was inspired from both Model, View and Controller scaffolder for ASP.NET MVC web applications in Visual Studio for Windows, and fine-grained table field selection and configuration matrix of CodeCharge Studio a sophisticated and robust RAD software for Windows which used to be popular between 2000 and 2012.
What can CodeIgniter Wizard be used for?
CodeIgniter Wizard is currently most suitable for developing the basis for administrative control panels for back-ends such as custom CMS, or any database-driven records filing and management application such as CRM and HRM systems. Furthermore the generated entity-models can be used for any type of application including the end user-facing front-end layer, therefore saving an considerable amount of time in addition to the backend development.
Furthermore, since form design and validation is one of the most tedius and time-consuming tasks, the highly re-usable code generated by CodeIgniter Wizard for this can be used elsewhere – inside or outside the application.
Another use case might be that in case you are new to CodeIgniter and want to learn it by examining code written with good practices, CodeIgniter Wizard can add great value to your learning process with.
Similarly CI 3 developers who want the port their code base, but are unfamiliar with CI 4 can benefit a great deal from CodeIgniter Wizard.
How is CodeIgniter Wizard different from other code generators?
Code generators in the market usually create some code sufficient enough to get the basic CRUD operations done usually in a cryptic way, not necessarily providing a very elegant user experience, and their code usually relies on some kind of heavy-weight custom library (even many of which are like framework-in-a-framework) and the code they generate is usually not portable elsewhere.
In contrast, CodeIgniter Wizard generates pretty standard and highly portable code which doesn’t really have any 3rd party dependency.
What code does CodeIgniter Wizard exactly generate?
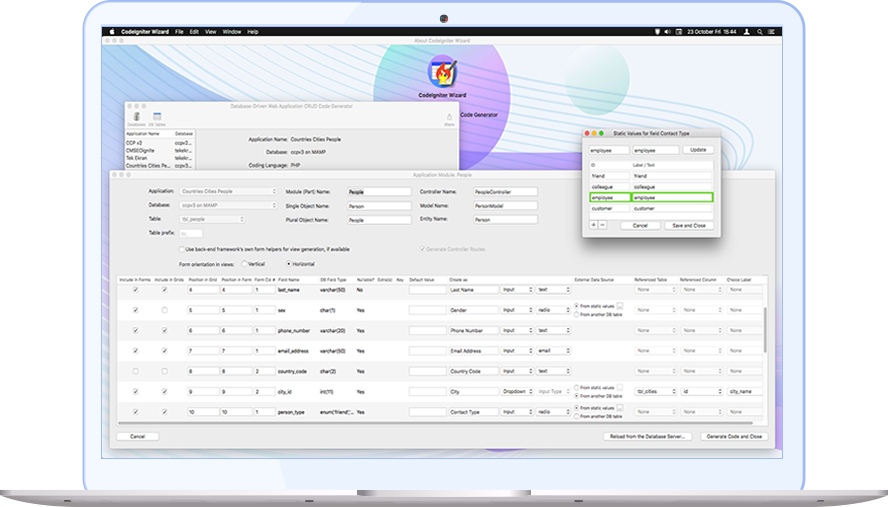
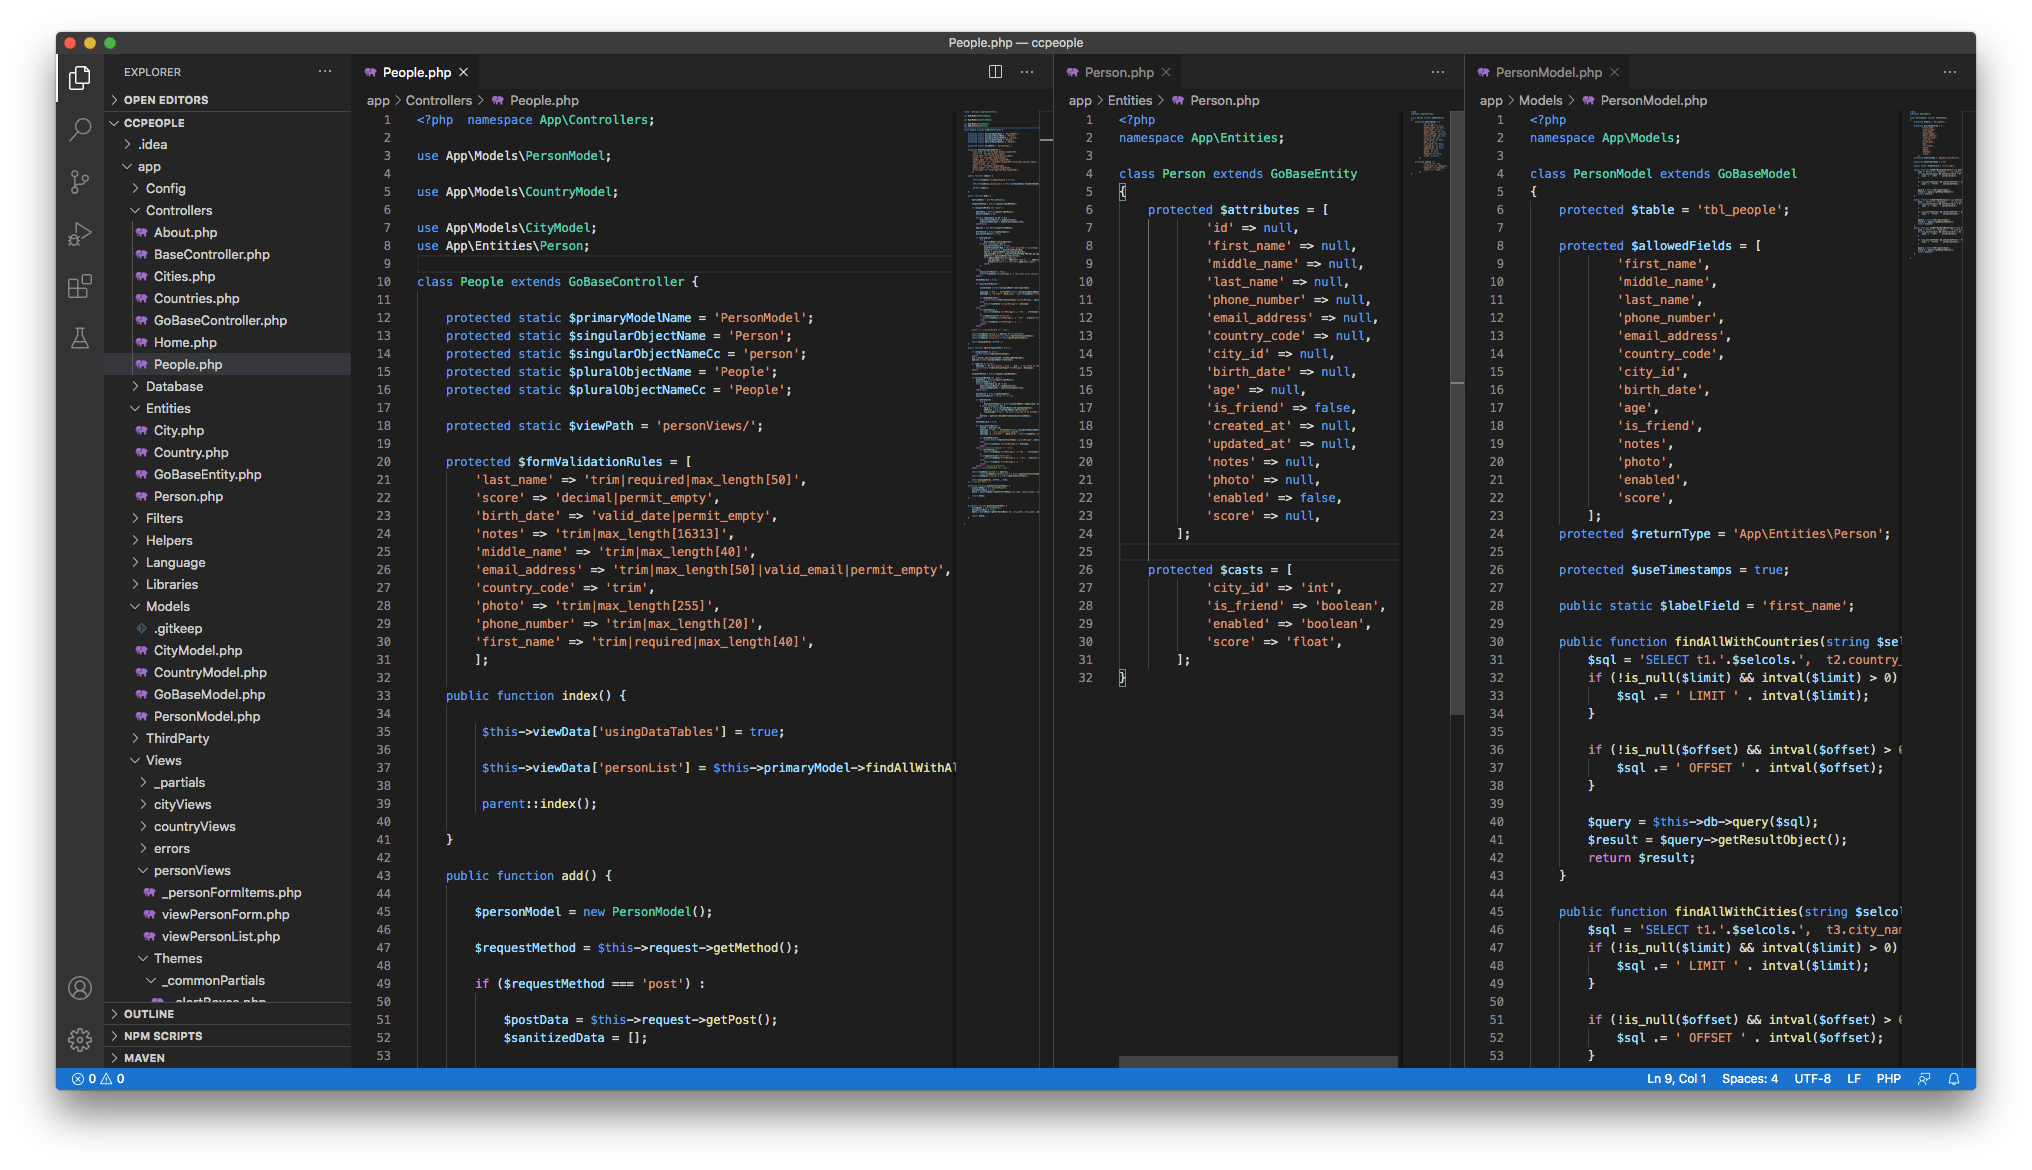
Class files for entities, models and controllers, view files for grid / table list screens, and forms with a diverse possibility of fields like input text, textarea, number, email, checkbox, radio buttons, dropdown select options, sidebar content and a simple dashboard starter.
Entity classes
Model classes
Controller Classes
Form view files
List (grid) views files
Admin & Dashboard template
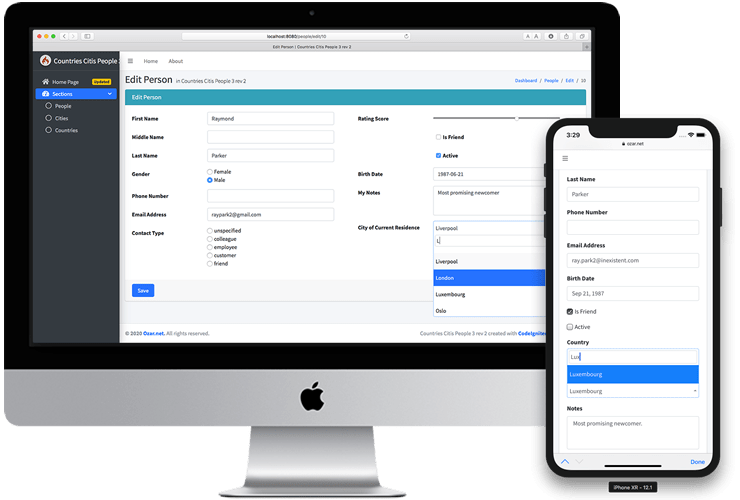
The views built constitute basic master-detail functionality.
The generated code includes the necessary input sanitization and form validation, also whatever’s required to select joined data across multiple database tables expecially conforming to foreign keys or custom relationships set in the GUI by the user.
Web Applications Generated with CodeIgniter Wizard
Web applications created with CodeIgniter Wizard have class and view files conforming to the MVC design pattern which you can customize to suit your own needs.
After you’re done creating your project in CodeIgniter Wizard, you can take it to your own develop environment and add your custom development on top of it.
Or you can only copy the parts you see fit to your project from the generated web application, which will still save you a great deal of time than creating everything from scratch or duplicating from your previous project.
Hand-Over from CI Wizard
You can take the entire web app and write your own code on top of it
Alternatively copy part(s) of it from entities and models to form fields or controller validation methods.
Don’t like the template? Swap it with your own, since cross-cutting concerns are minimal.
You can customize some or all of the generated code without worrying about dependencies as there are none!
CodeIgniter Wizard is the first code generator specifically made for Mac and is a great time-saver for PHP developers who can delegate some of their work to this powerful addition to the toolset.
Désolé, cet article est actuellement seulement disponible en Anglais Américain. Sa traduction en Français est cependant en cours. Veuillez revenir à cette page bientôt! Pour le confort de l’utilisateur, le contenu est affiché ci-dessous dans une autre langue. Vous pouvez cliquer le lien pour changer de langue active.
A file system is the component that allows an OS (operating system) read from and write to files on your devices storage. Every OS has its own file system, some of which are more compatible across platforms than others. For example, Mac computers used exclusively HFS+, while the current versions of Windows uses NTFS (New Technology File System). When you connect a storage device formatted in NTFS to a Mac, it is recognized and read alright, but you can’t modify it by any CRUD operation i.e. Create, Read, Update, Delete any files on it – unless you have some 3rd party add-ons installed and configured, and you can learn about them in this article to ultimately enable Mac to write onto NTFS drives.
Although the inability to write to NTFS on the Mac might become quite an issue for Mac newbies, be them first-time computer users or switchers from PC, the solution which is was invented as early 2000s, has evolved over the years as macOS (X) has been updated. The Mac operating system formerly called OS X – last year renamed macOS – can always read & write to PC disks and hard drive volumes formatted in FAT32 – a format which is not quite used any more due to its limitations of 4 GB maximum file size and 2 TB for maximum storage volume, whereas NTFS, free of these limitations, is readable not just by Macs since day 1, but by almost all non Windows-PC systems as well. However NTFS is not writable by default outside Windows due to a restriction brought on by Microsoft. As mentioned, there already are a few 3rd party solutions and workarounds to remove this restriction.
With the release of macOS High Sierra which introduced Apple’s new file system called APFS to be used by newer SSD-based Macs replacing the legacy HFS+, bringing on the ability to write to NTFS formatted volumes has become a little more complicated. Since my article titled Ability to write to NTFS volumes on the Mac published back in 2008 has become fairly obsolete so that the suggested workaround(s) in it are now very difficult if not impossible to apply, in this new, 2018 article, I’ll be explaining some of the best solutions for the need to write to PC volumes a.k.a. NTFS drives as an assertive old-timer. I’ve been using Apple computers since 1985 and have been doing computing cross-platform computing since 1993, and have been using Bootcamp since the year it came out and cross-platform working is at the heart of most of my digital activity.
Read on to find out about free and paid solutions to be able to write to NTFS disks and other storage devices mounted on the Mac.[Read more]
Désolé, cet article est actuellement seulement disponible en Anglais Américain. Sa traduction en Français est cependant en cours. Veuillez revenir à cette page bientôt! Pour le confort de l’utilisateur, le contenu est affiché ci-dessous dans une autre langue. Vous pouvez cliquer le lien pour changer de langue active.
If you are like me, you might be working on the Mac with dozens of windows open at the same time, yet trying to use the computer’s memory in the most economical way given the needs. As an application developer and a WordPress techie who spends most of his time working in and switching between the web browser windows, my IDE, database tools (especially Navicat), and the command line. Also I occasionally use a few applications from the Adobe Creative Cloud suite of products.
Once any Adobe application from the Creative Cloud suite is installed on a computer, Adobe first sets up a set of its mixture (or a hybrid) of ‘agent’ and ‘installation manager’ applications on the system, whose resources they could be consuming extravagantly. These little Adobe CC agent apps are always running and strutting around behind the scenes with GUI-less interfaces, even when you are not using a single Adobe application. And they are only noticeable from the list of background tasks and software daemons. To make things worse, they can be wasting a lot of your CPU time if not also a considerable amount of RAM.
In the first times, I personally did not care much about it, as I thought just hitting the Adobe CC icon (which resembles an infinity symbol) in the menu bar, and then quitting Adobe Creative Cloud from there would just shut it up, and reclaim all the memory and CPU it had been consuming.
Secret Agents also known as UNIX daemons Working in the Background
Adobe Creative Cloud software has a number of undercover agents always running in the background, apparently doing certain deeds of Adobe, even after quitting the application from the menu bar, or even when there is no single Adobe application that is active(ly running in the foreground) or one that you have ever launched. In fact, I have recently come to the realization that quitting Adobe Creative Cloud from the macOS menu bar does not really quit anything except removing its icon from where you last clicked it (in this case, the menu bar).
This can be clearly observed by watching them under-the-hood with the Mac’s Activity Monitor, or more conveniently with the command line bash utility from within the Terminal application.
Désolé, cet article est actuellement seulement disponible en Anglais Américain. Sa traduction en Français est cependant en cours. Veuillez revenir à cette page bientôt! Pour le confort de l’utilisateur, le contenu est affiché ci-dessous dans une autre langue. Vous pouvez cliquer le lien pour changer de langue active.
Although we do not hear the name « iWork » pronounced anywhere any more, it was the name for the trilogy of the full-blown productivity suite from Apple featuring word processing, spreadsheet and presentation applications alternative to Microsoft Office. The “hard-client” version of these applications – namely « Pages« , the word processing app, « Numbers » the spreadsheet app, and « Keynote« , the presentation app – are usually available for free exclusively to Apple customers who purchased at least one of Apple hardware product such as a Mac computer or an iOS-based smart device such as an iPhone or iPad or at what I would call a reasonable price to be purchased separately by old-timers and early-adopters like myself.
However, Apple has also made web versions of these applications back in 2011. As of 2012, the software set was free to any purchaser of a new Apple product – a perpetual license is automatically granted to the associated Apple ID of such a customer so that they can download them for any of their Apple devices from Apple’s App Store.
Very few people know that the web application version of Pages, Numbers, and Keynote are actually free for everyone who just signs up to obtain a free Apple ID and get access to iCloud.com (which is also for free) via this Apple ID even if they didn’t (and won’t) purchase anything from Apple. And because the iCloud versions of these applications simply run inside a web browser, you do not necessarily need a Mac or an Apple smart device to use them.
As mentioned above, the alternative “Office” productivity suite consists of “Pages” the word processor which is pretty much compatible back and forth with the files created with Microsoft Word, “Numbers” the spreadsheet solution with artistic style so that aside from creating and working with traditional spreadsheets, you can also create ones which look like product brochures with stylish tables and formatting with an impressive (but not extreme) compatibility with Excel, and the last but not least is the “Keynote” application which is a presentation application that works the “Apple way”. These three applications can import and export most MS Office files (except those loaded with VBScript macros), and they are even capable of producing PDF outputs. With Pages, it is even possible to export your document as an ePub file – great news for self-publishing book authors!
To use these applications, all you need is a browser and an “Apple ID”. Very few users know that on any computer, be it a Mac, Windows PC or Linux/UNIX machine – especially one freshly set up with any applications not yet installed except a default web browser coming along out-of-the-box, one can just log in to www.icloud.com and start working on .doc(x), .xls(x) and .ppt(x) files (or create them from scratch), share them by e-mail (with no e-mail client set up on that very computer) and even export them as PDFs – all just using a compatible browser.
Exporting a newsletter from Pages word processor running in a web browser connected to iCloud.com
At the time of this writing when Safari 10.1 is a month old since its release, iWork page on Apple’s web site acknowledged that iWork for iCloud works with Safari 6.0.3 or later, Chrome 27.0.1 or later, and Internet Explorer 10.0.9 or later. Although a recent version of Firefox should do fine as well, Apple does not seem to officially support Firefox, neither guarantees iCloud will work fine on it.